Repost! Fig Jam and Goat Cheese Crostini-So Easy!

fig jam and goat cheese crostini

This is a RePost from December 2016. I just enjoyed these delicious treats as lovingly prepared by my mom and it made think it may be worth a re-post. Enjoy!


Hello Everyone,

I hope you all enjoyed a fabulous holiday. I sure did and although I’m still trying to come out of a food coma, I realize we have one more celebration that may warrant some creative cooking.

At the risk of anyone thinking 3 Olives & Twist has turned into a food blog; today I offer you one more recipe that you may find useful when ringing in the New Year. Like most foods I prepare, it is quick and easy and, if this year’s Christmas Day reviews were any indication; it’s a winner.

The star of the dish is most definitely the fig jam. I pick mine up at Stop & Shop.  It is the Bonne Maman brand which is actually a fig preserve, but any fig jam, spread or preserve should do.

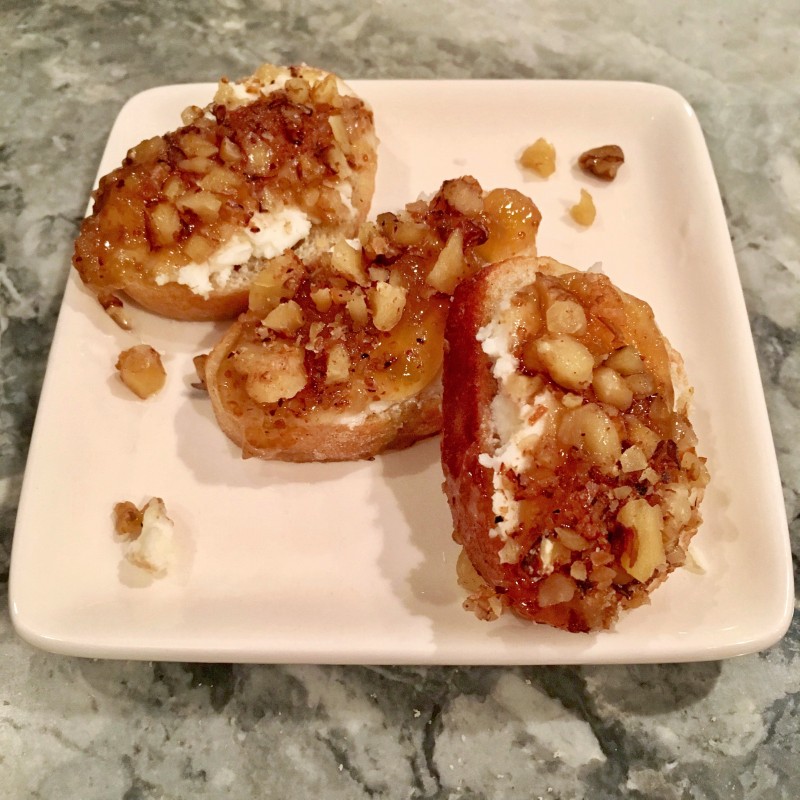
The combination of the sweet fig jam paired with the tart, creamy goat cheese is the perfect sweet and savory bite. To add just a bit more texture and flavor to this easy appetizer I also add toasted, chopped walnuts which seems to elevate this four ingredient appetizer. As far as hors d’oeuvres go, these are a favorite that seem to fly off the plate as soon as they hit the table.

When I first made these tasty bites, I used the prepared filo cups available in the frozen section of the grocery store. While good, I found them a little difficult to fill and pricey when I wanted to make them in bulk. This year, I opted to use a sliced baguette as the base and found the end result to be even more successful.

If you are looking for a quick and easy appetizer to welcome in 2017, give this recipe a try.

Fig Jam and Goat Cheese Crostini with Toasted Walnuts

Ingredients

  • 1 thin baguette, sliced. I have mine sliced right at the grocery store – just ask the bakery department.
  • 1 jar fig jam, preserve or spread
  • 1, 8 oz. package of goat cheese. Bring to room temperature to facilitate spreading.
  • ¾ cup chopped walnuts, toasted.

Directions

To begin, toast chopped walnuts in a dry pan. Be sure not to burn – I pull them off the burner just as soon as I smell the toasted, nutty aroma. Set aside.

Place baguette slices on a cookie sheet and drizzle with olive oil.  Toast lightly in a 350 degree oven for ten minutes. Remove from oven. Generously spread the room temperature goat cheese on each piece of toasted bread. Top with a teaspoon of fig jam. Sprinkle the toasted walnuts over the fig jam.

You’re done! If the fig jam seems a little loose, pop into the fridge for ten or fifteen minutes to help them set.

Otherwise, serve and enjoy.

Happy New Year.

All my very best in 2017!

8 Comments Continue Reading

French Toast Casserole Recipe – A Brunch Favorite

french toast casserole with strawberries


Last week, I had the pleasure of hosting Julia’s varsity basketball team for brunch following their practice. I gave the menu some serious thought because these girls are ravenous following two hours of sprints, drills and scrimmages.

Loading up on bagels and muffins was the easy and filling choice, but I also wanted to make something homemade. This French Toast Casserole recipe, originally found on Allrecipes.com, was the perfect dish. It is easy to make, hearty and unbelievably delicious.

When several of Julia’s teammates reported that it was the best thing they’d ever eaten, I took that as the highest compliment. When the double batch that I prepared for them was devoured, I knew I had a winning recipe worth sharing.

If you like French Toast, give this recipe a try. And when you take your first bite, be sure to dig deep.  The best part is the brown sugar butter at the bottom!

French Toast Casserole Recipe

Ingredients

french toast casserole ingredients


  • 1 cup brown sugar
  • 1/2 cup butter
  • a pinch of salt (this is my addition just to help balance all of the yummy sweetness)
  • 1 loaf crusty bread (I used Italian, original recipe calls for French), cut into bite-size pieces
  • 2 cups milk (I use fat-free which is what I have in the fridge, but I imagine whole milk would take this recipe over the top)
  • 6 eggs
  • 2 teaspoons vanilla extract
  • 1 teaspoon ground cinnamon
  • 1 additional tablespoon brown sugar

Directions

  • Grease a 9×12-inch baking dish.
  • Stir 1 cup brown sugar, butter and salt together in a saucepan over medium-low heat until butter melts and sugar dissolves into butter, 2 to 4 minutes. Pour into prepared baking dish and spread a 1 1/2- to 2-inch layer of bread pieces over the top.
  • Beat milk, eggs and vanilla extract together in a bowl; pour milk mixture over bread into the baking dish. Cover with plastic wrap and compress bread to ensure liquid is absorbed. Sprinkle cinnamon over the top. Secure plastic wrap and refrigerate, 8 hours to overnight. (I have neglected to take this step and the end result has been just as good.)

When ready to bake:

  • Preheat oven to 450 degrees. Uncover baking dish and sprinkle remaining brown sugar over the top.
  • Bake about 30-40 minutes until you see a rise in the bread mixture ensuring the eggs are cooked through. Top should be brown and bubbly.

If you’ve got a lot of mouths to feed for breakfast or brunch, give this French Toast Casserole recipe a try. Your guests will love it.

3 Comments Continue Reading

White Chocolate Covered Popcorn with Crushed Candy Cane

white chocolate covered popcorn and hot cocoa with marshmallows


Around the holidays and throughout the winter, I love to make this super simple popcorn recipe that is always a huge hit. My sister first introduced me to white chocolate covered popcorn several years ago. Thank you Karla!

I’ve always been a fan of white chocolate so the combination of creamy, sweet “chocolate” (some argue that white chocolate is really not chocolate at all – I don’t’ care, I just like it) plus the salty popcorn is a delightful bite.

The simple, two ingredient treat became a go-to dessert that I’d bring along to parties, play-dates or pretty much wherever.  Everyone loved it. I would always label it indicating that the white on white bowl of popcorn was, in fact, white chocolate covered popcorn. Without this explanation, I’m pretty sure people thought I was showing up with a plain bowl of popcorn.

If you know me, I’m not much of a baker so that might have been a distinct possibility. Just this week, I contributed two cookie desserts to our annual family cookie contest and you would have thought the baking aisle of a grocery store had exploded in my kitchen. Sugar, melted chocolate, pots and pans were everywhere. While the end result was actually pretty good, the mess was beyond my desire to repeat the baking process any time soon.

As it was, the white chocolate covered popcorn recipe was perfect for me because it was so easy. But after a few years, I began to get bored with the same old thing and started to get creative with add-ons. My most successful addition was crushed candy cane. It took the recipe from awesome to outrageous. The peppermint flavor brightened up the sweet and salty combo and the pops of red added a pretty dimension to the presentation.

When I paired the updated version of my sweet treat with a cup of hot cocoa the reviews were even more favorable. The kids loved it when they’d come in from sledding and would devour an entire bowl while warming up with cocoa. The scene always gave me a warm feeling and still does.

Just last week I served my white chocolate covered popcorn with crushed candy cane to a group of friends and I couldn’t have been happier to see them nibbling away, bite after bite.

So how simple is it?  Here’s the recipe.

White Chocolate Covered Popcorn with Crushed Candy Cane

Ingredients

  • 1 large bag of microwavable popcorn, popped
  • ½ bag of Nestle white chocolate morsels (12 oz. bag), melted
  • 1 cup crushed candy canes (less or more according to your taste)

Directions

I use the microwave but if you are not a fan of nuking your food, you can prepare your popcorn and chocolate on the stove top. If you do melt your white chocolate in the microwave, start at 1 minute, remove and vigorously stir, then return to the microwave for 15 second increments. Stirring vigorously each time until all morsels have melted. The morsels will continue to melt significantly as you stir, so you shouldn’t need to microwave more than 2 or 3 times.

Place popcorn in an oversized bowl, drizzle white chocolate and mix until all popcorn is coated. Add crushed candy cane, mix gently and spread onto a parchment lined cookie sheet.  Let sit until chocolate hardens or if you have room, pop in the refrigerator and it’ll be ready even sooner.

Once hardened, break apart, serve and enjoy!


Happy Holidays, Merry Christmas and Much Joy!


If you are still looking for a special gift to give, consider a gift certificate to my latest sponsor, Daring Spirits. Link directly to their site from the image in the sidebar to the right.

Or stop in to Helen Thomas in Andover -open until 9 pm every night until Christmas- link to their Facebook page from the sidebar.

Next Post Wednesday 12-28-2016


5 Comments Continue Reading

Caramelized Onion & Herb Cheese Tart Recipe

onion tart recipe ingredients: onions, pie crust, herb cheese
3 simple ingredients


Looking for a last minute appetizer recipe for Thanksgiving? This onion tart recipe is so easy and calls for only three main ingredients.

Caramelized Onion Tart Recipe

I served these little bites, along with my super easy Apple Pie Crescents recipe, back at my Daring Spirits event. They’ve been a big hit every time I’ve made them and in recent weeks I’ve whipped them up three times for different occasions. They’ve gotten such rave reviews, I find myself bringing them over and over again just for the accolades. These caramelized onion tarts are tasty, filling and can serve a decent crowd. A double batch is as easy to make as a single, so bring on the onions. Although I’m not a crier when it comes to cutting onions, this might be an occasion to review some tear-free onion cutting tips. Not sure that all of these work, but may be worth a shot.

Ingredients

  • 4-6 large onions (yellow are fine), sliced – once these are caramelized they reduce quite significantly so you need more than you think.
  • Garlic & herb spreadable cheese – at room temperature, really helps when spreading.
  • 1 package pie crust – cut into rounds
  • 2-3 Tablespoons oil
  • 2-3 Tablespoon butter

Directions

Add the butter and oil to a warm pan. Not too hot that it will burn the onions. Medium to medium-high should do the trick. Add onions and cook down until caramelized. This is the longest part of the process, about 15-20 minutes. Stir frequently.

Onions being prepared for onion tart recipe
Stages of the perfect caramelized onions

Meanwhile…

Roll out your prepared pie crust and cut into rounds, I use a small juice glass. Place on a parchment lined cookie sheet and bake according to instruction until rounds are lightly golden brown. Tip: I’m generally for using store brand products when possible, but I must admit that having used both store brand and Pillsbury for this recipe, I would go back to Pillsbury for all of my future tart needs. The store brand was far more fragile when bringing all the ingredients together.

steps involved in making this onion tart recipe
A few easy steps


Once cooked, remove and let cool.

Be sure to check on your onions and give them a stir once in a while. You want them to be a rich caramel color to bring out the sweetness and deep flavor.

Next…

Once the pie crust rounds are adequately cooled, spread the garlic and herb cheese generously on each. Here’s where letting the cheese come to room temperature will make spreading much easier. Be careful with the rounds as they are delicate.

Top with 1-2 teaspoons of the caramelized onions and return to warm oven for another 10 minutes just to help the ingredients set and come together.

Serve and enjoy this easy onion tart recipe!

Caramelized Onion tarts
Plate and sprinkle with chopped parsley for a touch of color.


Have a wonderful Thanksgiving everyone and please note:

I am taking a break from posting next week for the holiday and will return with a new post Monday, November 28. Be well!


2 Comments Continue Reading

Crescent Roll Recipes – I Like Them Apples

Crescent roll recipes - Apple pie crescent with strawberries
A great bite-crescent roll recipes


I’m not much of a baker and as much as I love apple pie, I’ve never actually made one. Recently however, I came across an apple pie recipe, or I should say variation, that even I could handle.

Apple Pie Crescents

I’m not sure what prompted me to try these little bundles of yumminess – I must have seen a crescent roll recipes video on Facebook or a television commercial – I can’t remember which. Either way, it looked so darned easy; I decided to give it a go. With a total of five ingredients these tasty bites were calling my name.  The original recipe is from Pillsbury and is one of many clever crescent roll recipes they have available on their website. Who knew you could do so much with crescent rolls? Not me – not surprising!

My version came pretty close to the original, but I don’t think I’ve ever made a recipe without having to make at least one substitution. I’m always missing something or have an alternative that I prefer to use. In this case, I already had red delicious apples so I used those, and I also had pumpkin pie spice in my rack so I used that instead of the called for, apple pie spice. Waste not want not, right?

Ingredients

  • apple (I use whatever I have), peeled, cored and cut into 8 wedges
  • 3 tablespoons butter
  • 1, 8 oz. tube crescent rolls
  • 1/3 cup packed brown sugar
  • 1 tsp pie spice (I used pumpkin)

Next…

  • Heat oven to 375 degrees and line a cookie sheet with parchment paper. Can I just say that I don’t know what I’d do without parchment paper. I use it for everything from pounding chicken breasts into the perfect cutlet to lining my cookie sheet for absolutely anything I put on them.  It just makes for a no stick, no mess, no fuss cooking scenario that always makes me glad I took the extra step to lay it down.
  • Stir your apple slices with 1 tablespoon of melted butter, set aside.
  • Mix brown sugar and pie spice.
  • Lay out your 8 individual triangles of crescent dough onto your parchment lined cookie sheet.
  • Sprinkle each crescent with the brown sugar mixture. (don’t be overly generous here, otherwise you’ll end up with a oozy mess. A good, heaping tablespoon should do).
  • Place one apple on the widest end of the crescent triangle and gently roll til secure.
  • With the remaining two tablespoons of melted butter, brush each bundle.
  • Bake 10-12 minutes or until crescents are golden brown
  • Let cool. Do not cover until cooled as the trapped steam will render the delicious, crescent crust soggy (yes, I made that mistake.)
  • Done! So easy and so good.
apple pie crescent roll ingredients
Ingredients and the process.


The Review

I’ll be honest, when I first made these, I didn’t think the apple would be cooked through. I was wrong, they were perfect and it was a delicious bite.  I ended up making three batches for my Daring Spirits event last week and they received great reviews.

I have finally found a dessert recipe that I don’t mind making and with the holidays right around the corner, this is sure to be a go-to contribution for Thanksgiving and Christmas alike.

Enjoy! As far as crescent roll recipes go, this one is a keeper for sure. And try it with pumpkin pie filling too. My mom told me hers were a huge hit.


8 Comments Continue Reading